There is a specific magic that happens when soft-baked sugar cookies meet a luscious, tangy frosting and a vibrant crown of fresh fruit. These Mini Fruit Pizzas are designed to capture that exact moment of bliss, whether you are hosting a high-end summer garden party or simply looking for a refreshing afternoon treat.
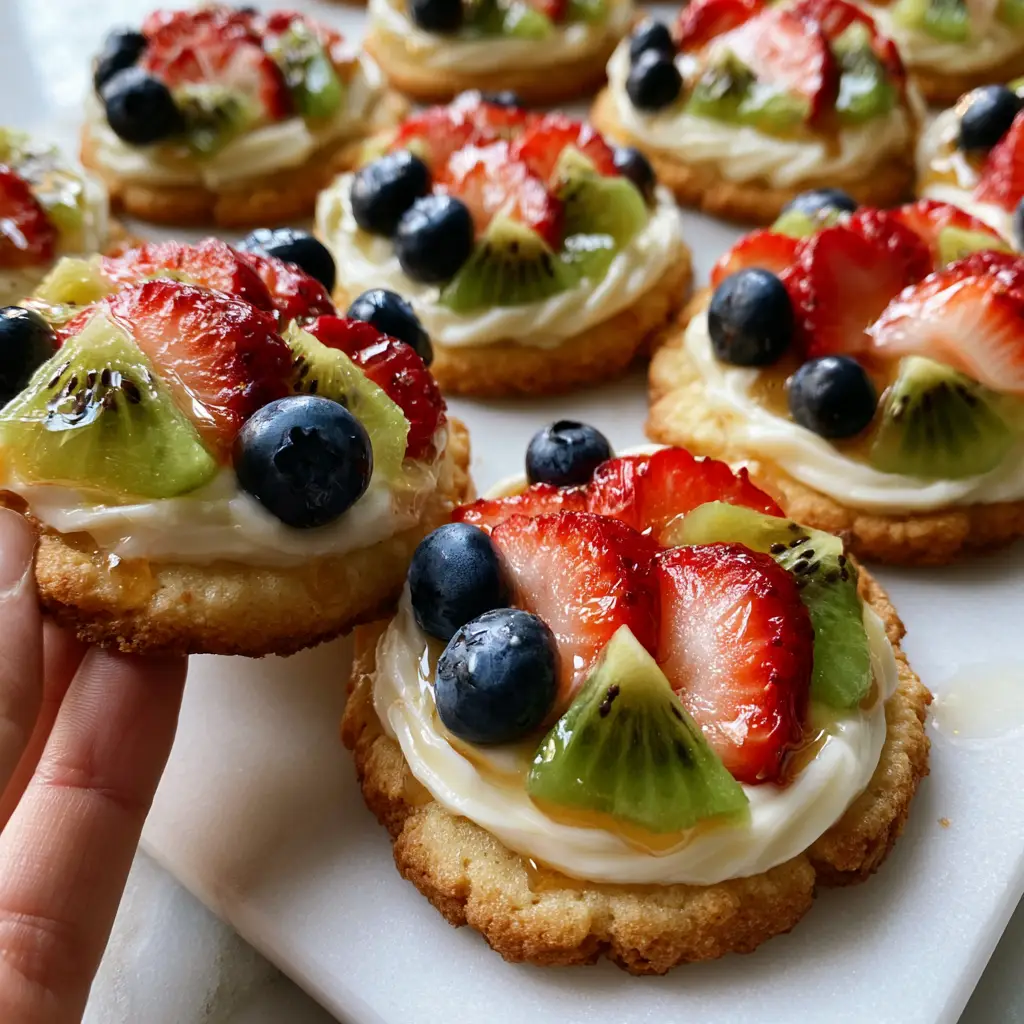
Imagine a smartphone-style photo where a dozen of these beauties are arranged on a clean white marble slab. The afternoon sunlight streams through a window, catching the glistening honey drizzle and highlighting the incredible texture of the thick, glossy cream cheese swirl.
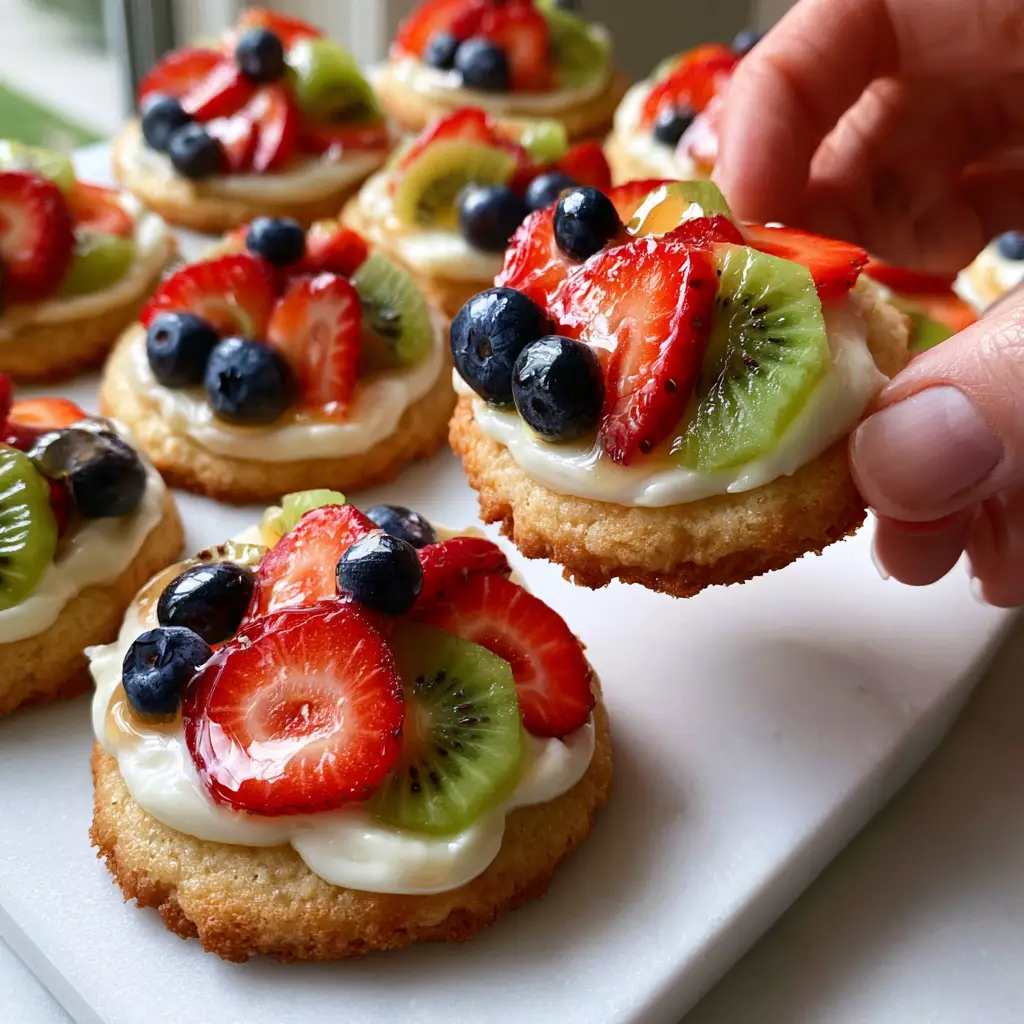
The beauty of the Mini Fruit Pizzas lies in their architectural contrast. You have the dense, slightly crisp edges of a golden cookie, the velvet-smooth richness of the glaze, and the snap of fresh strawberries, blueberries, and kiwi. It is a handheld symphony of textures.
Why These Handheld Dessert Pizzas Are The Ultimate Summer Treat
- Perfectly Portable: Unlike a traditional large fruit pizza, these mini versions are easy to pick up, making them the superior choice for mingling at parties.
- Textural Harmony: We use a specific soft-bake method to ensure the cookie base is thick and tender, providing a sturdy foundation for the heavy fruit toppings.
- Visual Masterpiece: The meticulous placement of vibrant red strawberries, plump blueberries, and bright green kiwi creates a rainbow effect that looks professional every time.
- Honey-Glazed Finish: A light coating of honey doesn’t just add sweetness; it provides that “high-end food blog” sheen and keeps the fruit looking fresh for hours.
The Building Blocks For The Perfect Soft-Baked Cookie Base
To achieve the result seen in our visual blueprint, we cannot settle for a thin, crunchy wafer. We need a cookie that can support the weight of a thick piped glaze and multiple pieces of fruit without crumbling.
Unsalted Butter (226g / 1 cup): High-quality butter provides the fat necessary for that “melt-in-your-mouth” feel. It should be softened to room temperature—roughly 65°F (18°C)—to ensure proper aeration during the creaming process.
Granulated Sugar (200g / 1 cup): This provides sweetness and helps create those slightly crisp, golden-brown edges seen in the side profile of our Mini Fruit Pizzas. The sugar also interacts with the flour to control spread.
Large Egg (1 unit): The egg acts as the primary emulsifier, binding the fats and liquids together. It provides the structure needed to prevent the cookie from being too fragile when picked up by hand.
Vanilla Extract (1 tbsp / 15ml): This is the aromatic backbone of the cookie. It bridges the gap between the sugary base and the tangy cream cheese glaze.
All-Purpose Flour (375g / 3 cups): We use all-purpose flour for its medium protein content, which gives us the perfect balance between a tender crumb and a sturdy base.
Baking Powder (1 tsp / 5g): This leavening agent is critical. It provides the “lift” that makes the cookies thick and soft rather than flat and hard.
Fine Sea Salt (1/2 tsp / 3g): Salt is the invisible hero that balances the sugar and enhances the natural flavor of the butter and vanilla.
Elements Of The Thick Glossy Cream Cheese Glaze
The visual prompt specifies a “thick piped cream cheese glaze” with a “glossy white” finish. To achieve this, we need specific ratios to ensure the frosting holds its shape under the weight of the fruit.
Full-Fat Cream Cheese (226g / 8oz): Do not use the spreadable kind from a tub. Use a cold block of cream cheese for maximum stability, which allows for those beautiful, thick piped swirls.
Unsalted Butter (113g / 1/2 cup): Adding butter to the glaze increases its richness and helps it set firmly in the refrigerator.
Powdered Sugar (480g / 4 cups): Also known as confectioners’ sugar, this provides the sweetness and the structural “body” of the glaze. It must be sifted to ensure a smooth, glossy appearance.
Heavy Cream (2 tbsp / 30ml): A splash of heavy cream is the secret to achieving that “glossy” finish described in the Midjourney prompt without making the glaze too runny.
Selecting The Vibrant Fruit Toppings
The visual impact of Mini Fruit Pizzas depends entirely on the quality of your produce. Since these are served fresh, look for fruits at the peak of their season.
Fresh Strawberries: Choose berries that are deep red all the way to the stem. We will be slicing these into uniform pieces to lay across the cream cheese swirl.
Organic Blueberries: Look for plump, firm berries with a dusty blue “bloom.” These are placed whole to add height and a “pop” of juice to every bite.
Vibrant Green Kiwi: The kiwi provides a necessary tartness to cut through the sweet glaze. Peel them carefully and slice into semi-circles for a decorative touch.
Honey (2 tbsp / 30ml): A light honey drizzle acts as a natural varnish. It creates the “light honey sheen” mentioned in our blueprint, making the fruit look like jewels under the sunlight.
Essential Equipment For Professional Results
To recreate the high-end food blog aesthetic, you will need a few specific tools. A marble slab or clean white surface is ideal for presentation, but the preparation requires precision.
You will need a stand mixer or electric hand mixer to cream the butter and sugar effectively. A 3-inch (7.6cm) round cookie cutter ensures every cookie base is identical in size.
For the “thick piped” look, a large piping bag fitted with a wide round tip or a star tip is essential. This allows you to create the swirl that serves as the bed for your fruit toppings.
Step-By-Step Guide To Crafting Mini Fruit Pizzas
1. Preparing The Sturdy Sugar Cookie Base
In your mixer bowl, beat the softened butter and granulated sugar for at least 3-4 minutes. You are looking for a visual change: the mixture should turn pale yellow and look fluffy. This aeration is what makes the cookies “soft-baked.”
Add the egg and vanilla, mixing until fully incorporated. In a separate bowl, whisk the flour, baking powder, and salt. Gradually add the dry ingredients to the wet mixture on low speed.
Stop mixing the moment the flour disappears. Over-mixing will develop gluten, turning your soft cookie into a tough biscuit. Wrap the dough and chill for 30 minutes; this prevents the cookies from spreading too much in the oven.
2. Sizing And Baking For Golden Edges
Preheat your oven to 350°F (175°C). Roll the chilled dough to a thickness of 1/2 inch (1.25cm). Use your round cutter to stamp out circles and place them on a parchment-lined sheet.
Bake for 10-12 minutes. The sensory cue to look for is “slightly crisp edges” that are just beginning to turn a pale golden brown. The centers should still look slightly soft and underbaked—they will firm up as they cool on the marble slab.
3. Whipping The Glossy Cream Cheese Glaze
Beat the cold cream cheese and softened butter together until smooth. Gradually add the powdered sugar one cup at a time. Once incorporated, pour in the heavy cream and vanilla.
Whip on high speed for 2 minutes. The glaze should be thick enough to hold a stiff peak. Transfer this to your piping bag. If the glaze feels too soft, pop the piping bag in the fridge for 10 minutes before use.
4. Artistic Assembly And The Honey Sheen
Once the cookies are completely cool to the touch, pipe a generous, thick swirl of glaze starting from the center and moving outward. Leave a small margin of the golden cookie visible at the edges.
Place one strawberry slice, two whole blueberries, and one kiwi slice on each cookie. Press them gently into the glaze so they stay secure. Finally, use a spoon to drizzle a tiny amount of honey over the fruit, creating that glistening, high-gloss finish.
Expert Tips For The Perfect Handheld Dessert
- Temperature Control: Never frost a warm cookie. The cream cheese glaze has a high fat content and will melt instantly, ruining the thick piped aesthetic.
- Fruit Dryness: After washing your berries and kiwi, pat them completely dry with a paper towel. Excess moisture will cause the glaze to “weep” and become runny.
- The Honey Trick: If your honey is too thick to drizzle, microwave it for 5-10 seconds. It should flow like liquid gold for that perfect sheen.
- Dough Thickness: For that “side profile” look where the cookie is substantial, do not roll the dough too thin. 1/2 inch (1.25cm) is the sweet spot.
Storage And Freshness Guidelines
Mini Fruit Pizzas are best enjoyed within 4-6 hours of assembly to maintain the crispness of the cookie. However, you can store leftovers in a single layer in an airtight container in the refrigerator for up to 2 days.
Note that the kiwi and strawberries may release juice over time, which can soften the cookie base. For the best experience, prep the cookies and glaze ahead of time, but assemble the fruit just before serving.
What To Serve With Mini Fruit Pizzas
These sweet treats are the perfect finale to a summer meal. If you are hosting a backyard BBQ, they pair beautifully with a refreshing cucumber and feta salad or a vibrant peach arugula salad.
If you want to keep the dessert table themed, consider offering a variety of textures. These pizzas provide the fruit element, while chewy s’more bars or chocolate chip cookie pizzas provide the rich, chocolatey contrast your guests will love.
For a lighter, savory balance, a fresh corn salad works wonderfully as a side dish for the main course before the fruit pizzas are brought out.
Frequently Asked Questions
You can freeze the baked cookie bases for up to 3 months. However, we do not recommend freezing the assembled pizzas as the cream cheese glaze and fresh fruit will change texture upon thawing.
Absolutely. You can prepare the glaze up to 3 days in advance. Store it in an airtight container in the fridge and give it a quick whip with a mixer to restore its fluffy texture before piping.
Yes, you can use store-bought sugar cookie dough to save time. However, ensure you roll it thick (1/2 inch) to provide enough structure for the piped glaze and heavy fruit toppings.
The key is to pat the washed fruit completely dry with paper towels before placing them on the pizza. Additionally, assembly should happen within a few hours of serving for maximum crispness.
If your honey is cold or crystallized, it won’t have that high-gloss sheen. Warm the honey slightly in the microwave for 5-10 seconds until it is thin and fluid before drizzling over the fruit.
The Ultimate Mini Fruit Pizzas Recipe
Ready to create these stunning, Instagram-worthy treats? Follow the detailed recipe card below to master the art of the soft-baked crust and the perfect fruit arrangement.
Mini Fruit Pizzas With Soft Sugar Cookie Crust And Thick Cream Cheese Glaze
Ingredients
Equipment
Method
- Beat softened butter and granulated sugar in a stand mixer for 3-4 minutes until pale and fluffy.
- Mix in the egg and vanilla extract until fully combined.
- Gradually stir in flour, baking powder, and salt on low speed just until a dough forms. Chill for 30 minutes.
- Roll dough to 1/2 inch thickness. Cut with a 3-inch round cutter. Bake at 350°F (175°C) for 10-12 minutes until edges are slightly golden but centers are soft.
- Whip cream cheese, butter, powdered sugar, and heavy cream until thick and glossy. Pipe a thick swirl onto each cooled cookie.
- Arrange strawberry slices, blueberries, and kiwi on top of the glaze. Drizzle with honey for a glossy sheen.
Notes
Pat the fruit dry after washing to keep the glaze stable and avoid weeping.

Closing & Call To Action
These Mini Fruit Pizzas are more than just a dessert; they are a celebration of summer’s best flavors. The combination of the buttery sugar cookie and the thick, tangy glaze is a crowd-pleaser that never goes out of style. Whether you are following the visual blueprint for a party or just treating your family, the result is always impressive.
Did you make these? I would love to see your creations! Leave a comment below or tag me in your photos. Don’t forget to save this recipe to your dessert boards on Pinterest so you can find it all summer long!